Yoda Footprint Art ~ May the force be with you!

Yoda Footprint Art – May the Force Be With You!

Last few months were so busy for us, that I was not getting enough time for art activities with Akira. Also, since Akira started the daycare she has been busy with activities in her school. Then I saw this post from Kim @ The Pinterested Parent, and it was time for the force to awaken! So here I am making the yoda footprint art with my little one. Perfect timing as it is star wars week at school as well. Hopefully I can catch up with the movie as well this week. πŸ™‚

Yoda Footprint Art ~ May the force be with you!

Supplies

  • Crayola Washable Kid’s Paint
  • Crayola Artist Brushes
  • Carstock Paper
  • Colored Markers

Directions to make the Yoda Footprint Art

  1. Get your workspace ready with a white carstock paper and the kid’s paint.
  2. Paint your child’s foot with green near the ankle and brown near the toe area. The green color will make the head and the brown color will make the body for Yoda! Now press your child’s foot in the center of paper to get the footprint.
  3. Use some more green paint to make the ears. Add the robe details using darker brown color.
  4. Paint the eyes using the white color
  5. Paint the lightsaber using brown and green color. I mixed more yellow with my green color to get fluoroscent laser like effect.
  6. I did not have any fine brush, so I used the colored markers to give outline and details to the face and the robe
  7. Now its time to spread the message “May the force be with you!”. Don’t forget the signature.

So are you ready for the “The Force Awakens”? πŸ™‚

Yoda Footprint Art ~ May the force be with you! Perfect activity to do with your little Star Wars fans.

Leather Pencil Skirt with Cape Top

A leather pencil skirt is like a staple for the fall wardrobe. But when you have a rich olive green skirt paired with a cape top, you upgrade the staple!

Free People Wrap Dress with Knee High Lace-up Suede Boots and Wool Cap.

I bought both the skirt and the top from Zara. The skirt came in other pretty colors as well, and is still available on the site! The top was actually a steal with only $10 from its ‘Special Prices’ collection.

I like playing with texture and volume with my outfit. It not only makes it interesting, but flattering as well. For this outfit I am wearing a relaxed cape top with the fitted pencil skirt.

Leather Pencil Skirt in Khaki with Cape Top and Skinny Scarf. The outfit is ready for the fall street fashion with the Patent Ankle Boots and Fringed Bag!

Another fall staple is the fringe bag. This one is from Aldo and came in lot of other pretty colors as well. I like the soft velvety suede and its golden beige color. You can still buy it in black color on the site.

Leather Pencil Skirt with Cape Top and Skinny Scarf.

For my bare neck, I just threw in this pretty silky skinny scarf. It immediately elevated the outfit.

Zara High Heeled Patent Booties.

And talking about those shoes. Aren’t they just gorgeous in the patent leather and the mid-calf length? These ankle boots from Zara were sold out before Nov. Luckily I got my hand on it πŸ™‚

Easy Potato Latkes with No Eggs and only one required ingredient!

Easy Potato Latke / Pancake / Galette (Aloo Tikki)

Happy Hanukkah or Chanukah everyone! Last week, it was ‘Hanukah week’ in Akira’s daycare and they were doing activities related to that. One of the days they painted ‘Potato Latke’. Being still new to all the festivals and traditions here, I thought to myself – What is a Latke? I had never heard of it before, so I started reading more about it. It is actually very similar to the Indian ‘Aloo Tikki’, which is a very popular street food/snack item in northern part of India. Coming from the eastern part of India, I grew up loving potato. So I had the instant urge to try a latke recipe.

Most of the recipes I looked for had multiple ingredients and eggs. Also, you had to soak them to avoid discoloration and then drain them well before frying. So I decided to make my own recipe for the latke based on my aloo tikki recipe, keeping the traditional flavor profile for it. The trick is to just the partially boil or steam the potatoes and cool them before grating. This way you avoid any browning and there is no draining required. So you end up with crisp exterior and soft interior for the latkes. Also, the boiled potatoes stick together, so there is no need for any binding agent. You just need some spice and herbs to spruce it up!

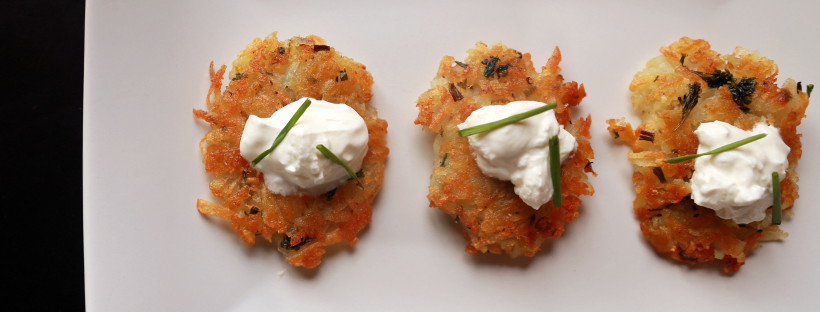
I also pan fried it, instead of deep frying it. This meant lesser oil, but not too less as you want the right texture. I served it the traditional way using sour cream. But you could just eat it on its own, like Akira was doing it as soon as I took it out of the pan. Or maybe just some ketchup…

Golden Crisp Potato Latke served with sour cream. This recipe is easy to make and requires only one ingredient. No eggs, No browning, No draining!

Steps for making the Potato Latke

  1. Boil Potatoes
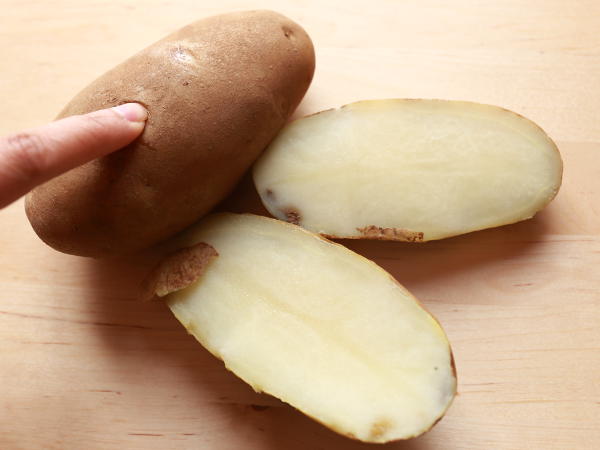
  2. Boil the potatoes till they are partially cooked so that they are soft to touch, but don’t give in completely. If you cut the potato in half, you should not see any raw potato. Let the potatoes cool down before peeling. You can also boil them a day ahead and keep them in the refrigerator. This makes peeling and grating easier.

    Also remember to use the russet or baking potatoes, as they fry better.
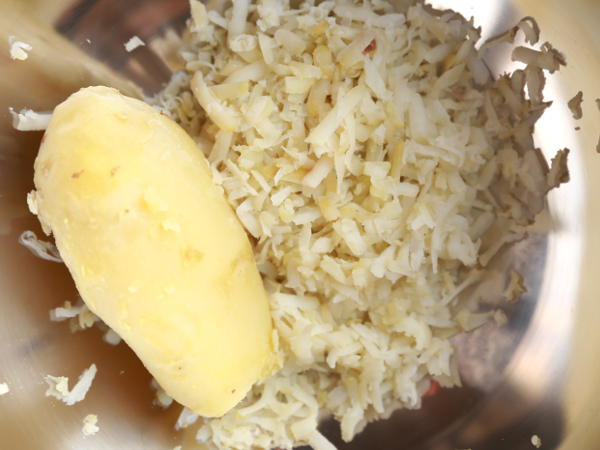
    For easy latke boil the potato to undone stage and cool it for grating.

  3. Grate Potatoes
  4. After peeling the potatoes, use a hand grater with large holes on top of a bowl to get the shredded potato.
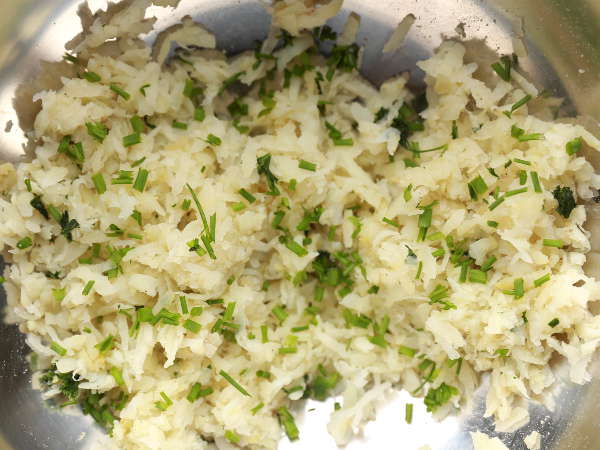
    Peel and grate the boiled potato for latke

  5. Season Potatoes
  6. This latke just needs salt and pepper, but the parsley and chives lend it a fresh flavor. In the Indian version, we add coriander/cilantro to the aloo tikki.

    Add the salt, pepper, parsley and chives to the grated potatoes. Now using a hand or a spatula mix them gently to combine.

    Season the grated potato with salt, pepper, parsley and chives for the easy latke.

  7. Pan Fry the Potato Patties
  8. Set the pan on the stove on medium-high heat. Coat the pan with olive oil around 2-3 tablespoons.

    Now grab a handful of the grated potato and shape them to make a flat patty from it. The thinner you make it, the more crispy it will be. I actually made around 12 patties from the 2 potatoes.

    Now place the patties in the oil, when the pan is hot. Turn down the flame to medium heat and let it cook till you see it getting golden brown at the bottom, around 4-5 minutes. Once golden brown, flip the patties and let it cook on the other side for another few minutes. At this point you might want to add more oil if required, as mine soaked most of it.

    Pan fry the potato patties over medium heat to get golden crisp latkes!

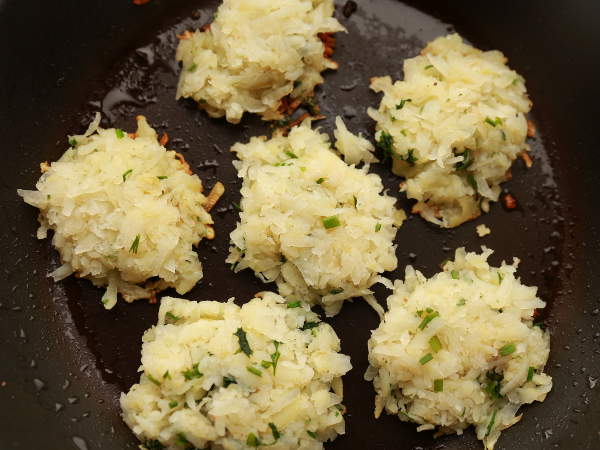
    Once cooked on both sides transfer to a dish lined with paper towel to soak some of the oil πŸ˜€

    Now enjoy it with sour cream and chives or any other way you like your latkes!

    Easy Potato Latke / Pancake / Galette (Aloo Tikki)

    Easy Potato Latke / Pancake / Galette (Aloo Tikki)

    Get crispy golden potato latkes with this easy single ingredient vegan recipe. No browning or squeezing of potatoes!

    Prep Time: 10 minutes

    Cook Time: 20 minutes

    Total Time: 30 minutes

    Yield: 12-15

    Serving Size: 1-2

    Ingredients

    • 2-3 large russet potatoes
    • 1 tsp salt or as per taste
    • 1/4 tsp ground pepper
    • 5-6 tbsp olive oil
    • 4-5 sprigs of chives, finely chopped (optional)
    • half a bunch of parsley leaves, finely chopped (optional)

    Instructions

    1. Boil or steam the potatoes till they are partially cooked, with no raw center. Keep them aside for cooling before peeling. You can store them hours or days ahead in a refrigerator.
    2. After peeling the potatoes, grate them using a hand grater with large holes in a bowl.
    3. Add the salt, pepper, parsley and chives to the grated potatoes in the bowl.Combine them gently.
    4. Place a pan over the stove on medium-high heat and coat it with 3 tablespoons of oil, around 1/8 inch. Take a handful of grated potatoes and shape them into flat patties. Once the pan is hot, place the patties in the oil. Cook on medium heat until the latkes are golden brown at the bottom, around 4-5 minutes. Flip them to cook the other side, another few minutes. Transfer to a dish lined with paper towel, while making rest of the batch.

    Notes

    * Boil or steam the potatoes in advance. You can store them in refrigerator for upto 3-4 days.

    * The latkes can be made a day ahead in advance. Reheat for a short time in a 425 degree oven before serving.

    https://www.fanciersworld.com/easy-potato-latke-pancake-galette-alootikki/

It’s a Wrap Dress

I had my last walk among the fall colors this year before we got hit by the storm and the cold weather. Love how the color of the leaves match with my wrap dress outfit πŸ™‚

Free People Wrap Dress with Knee High Lace-up Suede Boots and Wool Cap.

I recently purchased this dress from Free People in Maple color which is almost sold out now. But they added more colors for the dress, if you are interested.

The fall and material of the dress makes it very flattering on the body and I love those extra long-sleeves. The plunging neckline makes it super flattering as well. You can dress it up or down, wear it as a cover-up or go dressy with heels. I decided to pair it with my favorite Knee High Lace-Up Boots from Free People itself.

Free People Wrap Dress with Knee High Lace-up Suede Boots and Wool Cap.

The wool cap gives a chic and classic touch to this outfit. I actually had 2 caps and was not sure which one to wear, so I tried both. πŸ˜‰

Which one do you like more?

Free People Wrap Dress with Knee High Lace-up Suede Boots and Wool Cap.

Oh and yes the dress has pockets too!

Free People Wrap Dress with Knee High Lace-up Suede Boots and Wool Cap.

Free People Tiny Dancer Wrap Dress (similar here and here) | AEO Mini Fringe Crossbody Purse (similar here, here and here) | Free People Johnny Tall Boot (similar here, here, cheaper here and here) | Cap (Old, similar here)

Mini Pecan Pumpkin Pies perfect for the holidays!

Mini Pecan Pumpkin Pies

Thanksgiving dinner is incomplete without a pie. To give a mini twist to the traditional pumpkin pie, I decided to make these mini pecan pumpkin pies for our Thanksgiving dinner this year. I did make these pies last year as well and they were a huge hit, so I decided to continue the tradition. πŸ™‚

You can also make them as little sweet treats for the holidays. These bite sized portions are big enough to satisfy your sweet tooth without the guilt of eating that big pie slice, specially during the holidays. But careful, you won’t realize how quickly these delecious pies vanish into your mouth! πŸ˜‰

Mini Pecan Pumpkin Pies perfect for Thanksgiving or as Holiday Treats

Steps for making the Mini Pecan Pumpkin Pies

  1. Make the pie dough
  2. Place the pecans, sugar, salt and flour in the food processor bowl with the chopping/mixing blade attachment. Pulse the ingredients until the pecans are ground and combined with the other ingredients.

    Mix the dry ingredients for making the crust for the mini pecan pumpkin pies /></p>
<p>Add in the butter and pulse until dough resembles coarse meal. </p>
<p><img decoding=

    Slowly pour in the ice water through the feed tube until the dough comes together.

  3. Bake the pie crust
  4. Transfer the dough from processor bowl to a clean work surface sprinkled with flour. Form the dough into a ball and divide it equally into 24 pieces.

    Divide the dough into 24 equal pieces for the mini pecan pumpkin pie crust

    Roll each piece into a ball and evenly press into each cup until the bottom is covered. If the dough is sticky, dip your finger in flour first.

    Set the dough in the muffin cups to back the mini pecan pumpkin pie crust

    Bake 15 to 18 minutes, until the crusts are very golden. Check periodically to make sure they don’t get too brown. If you are using the mini cupcake pans (24 cup muffin tin), they will be done in 10-13 minutes.

    Mini pecan pumpkin pie crust after baking

  5. Make the pie filling
  6. While the pie crusts are baking in the oven, we can make the pie filling. In a medium bowl, whisk the egg , egg yolk, corn syrup, sugar, pumpkin filling and vanilla. Stir in the chopped pecans.

    Pie filling for the mini pecan pumpkin pie.

  7. Bake the pie
  8. Remove the dough from oven and spoon 1 tablespoon of the filling into each cup. Since I used the 24-cup small cupcake pan, I had lot of leftover pie filling which I used for next day. It will be ideal to use 2 12-cup muffin tins. I could not find my 2nd 12-cup muffin tin and I did not have the time to make it in 2 batches, so I decided to use the 24-cup muffin tins. Regardless the pan size, the pies come out great.

    Mini pecan pumpkin pie before going into the oven.

    Top each with 1 pretty pecan half. Return the pans to the oven and continue baking, for 12 to 15 minutes more, until the pumpkin filling is set. Let it cool for 15 minutes before removing from the pans. I was impatient and ended up with some crumbly pie pieces.

    Mini pecan pumpkin pies fresh out of the oven.

    These looked so tempting that some of them did not even make it to the serving plate πŸ™‚

    Mini Pecan Pumpkin Pies

    Mini Pecan Pumpkin Pies

    These mini pecan pumpkin pies are surely a crowd pleaser with the best of both pies. They are perfect for the thanksgiving dinner or as little sweet treats for holidays.

    Prep Time: 25 minutes

    Cook Time: 30 minutes

    Total Time: 55 minutes

    Yield: 24

    Serving Size: 1

    Ingredients

    • Nonstick cooking spray / Butter
    • For the dough:
    • 1/4 cup pecans
    • 1/4 cup sugar
    • 1/2 teaspoon salt
    • 3/4 cups all-purpose flour, plus extra for shaping dough
    • 6 tablespoons butter, ice-cold
    • 2 to 3 tablespoons ice water
    • For the filling:
    • 1 egg, plus 1 egg yolk
    • 1/2 cup dark corn syrup
    • 1 tablespoon sugar
    • 1/2 cup canned pumpkin pie filling
    • 1 teaspoon vanilla
    • 1/4 cup pecans, chopped plus 24 halves for garnish
    • Special equipment: 2 (12-cup) mini muffin tins

    Instructions

    1. Preheat oven to 350 Β°F. Spray the bottoms and sides of the mini muffin tins with cooking spray or butter them using a brush.
    2. For the dough
    3. In a food processor, pulse the pecans, sugar, salt and flour until the nuts are ground and the ingredients are combined. Add in the butter and pulse until dough resembles coarse meal. Slowly pour in the ice water through the feed tube until the dough comes together. Remove from processor bowl to a clean work surface sprinkled with flour.
    4. Form the dough into a ball and divide evenly into 24 pieces. Roll each piece into a ball and evenly press into each cup until the bottom is covered. If the dough is sticky, dip your finger in flour first.
    5. Bake 15 to 18 minutes, until the crusts are very golden. Check periodically to make sure they don't get too brown.
    6. For the filling
    7. While the crust is baking - in a medium bowl, whisk the egg , egg yolk, corn syrup, sugar, pumpkin filling and vanilla. Stir in the chopped pecans.
    8. Remove the dough from oven and spoon 1 tablespoon of the filling into each cup. Top each with 1 pretty pecan half. Return the pans to the oven and continue baking, for 12 to 15 minutes more, until the pumpkin filling is set. Allow to cool before removing from the pans.

    Notes

    * Spray the measuring cup with cooking oil before measuring corn syrup to allow for smooth removal from the cup.

    * If using the 24-cup mini cupcake tin, then reduce the baking time of crusts by 5 min.

    * If using the 24-cup mini cupcake tin, then there will be leftover pie filling. Use them for the next batch or just bake the filling in a ramekin at 350 Β°F to get a pudding πŸ™‚

    * This recipe is from Sunny Anderson

    https://www.fanciersworld.com/mini-pecan-pumpkin-pies/

Quick Kalakand ( Ricotta Fudge ) made using Ricotta cheese and Condensed Milk

Quick Kalakand – Ricotta Fudge

Diwali always reminds me of home and all the yummy sweets my mom made. We usually had lot of snacks and sweets for the occasion at home. So this year I hosted the Diwali party at my place with all the Indian street food on the menu. But with all the food preparations and decorations at home, I totally forgot about the sweets! That is when I decided to make this quick kalakand as a dessert. Actually Vinay made it this time under my supervision πŸ˜‰

This recipe was actually introduced to me by my friend Bhagvathi and I have been making it ever since, as it so easy and quick to make. This homemade Kalakand tastes just like or actually better than the one bought from the Indian Sweets Store.

Traditionally Kalakand is made by using curdled milk and reducing it over a low flame. But this quick version tastes just as milky and soft as the traditional one. Kalakand generally tends to be really soft, so you can even serve it like a pudding or ricotta fudge. There are some recipes to make it using a microwave as well, but I am not a heavy microwave user and I prefer my good old pot and pan recipes. Regardless, this recipe turns out a moist rich milk cake – Kalakand.

Kalakand slices using quick recipe from Ricotta cheese and Condensed Milk

Steps for making the Kalakand

  1. Mix Ricotta and Condensed Milk
  2. Yup these are the only 2 ingredients you really need to make this yummy dessert. Transfer the Ricotta to a pan. I used a non-stick pan as the mixture tends to stick to the bottom while reducing. Pour the whole condensed milk can into the pan too. Mix them well together using a spatula. The mix will look like a paste at this point.

    Mix Ricotta Cheese and Condensed Milk to get a Kalakand mix

  3. Reduce the mix
  4. Place the pan over a stove on medium-high setting. Keep stirring in between to avoid sticking of the mixture. Reduce the mix to semi-solid state where you can see some chunky granules, around 20-25 minutes. Be careful, as towards the end the mix will start splattering as well. πŸ™‚

    While the mixture was getting reduced I chopped some pistachios and cashews using a mortar and pestle. I also made my own cardamom powder by grinding 5-6 cardamoms, and used a strainer to get the fine powder out of it.

    Kalakand mix after reducing it

  5. Add flavorings
  6. I soaked 6-7 saffron strands in some warm milk in a small bowl. Once the ricotta mix has reduced to the desired consistency, add the saffron strands, cardamom powder and rose water to it. Mix well.

    Saffron strands soaked in warm milk

  7. Transfer for Setting
  8. Transfer the mix to a greased/lined baking pan or plate or thali. Spread evenly and flatten the mix using a spatula. Sprinkle chopped Pistachios and Almonds on top of the mix. This fudgy mix is really soft and we need to transfer it to a refrigerator for firming, around 1 hr or more. I usually leave it overnight.

    Kalakand mix spread on a baking sheet

  9. Slice for Serving
  10. Once the fudge is firm, divide it into equal portion slices using a knife. I usually get 30 pieces as I lay them thinner. I also like to decorate each of my slices with a pistachio half.

    Saffron strands soaked in warm milk

    Now you are ready to serve Kalakand as a dessert!

    Quick Kalakand – Ricotta Fudge

    Quick Kalakand – Ricotta Fudge

    Quick and easy 2 ingredient recipe for the popular Indian dessert Kalakand. You can serve this soft and moist milk cake as a ricotta fudge or pudding.

    Prep Time: 5 minutes

    Cook Time: 25 minutes

    Total Time: 1 hour, 30 minutes

    Yield: 25-30

    Serving Size: 1

    Ingredients

    • 15oz ricotta cheese (1 tub)
    • 14oz condensed milk (1 can)
    • 1/2 tsp cardamom powder
    • 1/4 – 1/2 tsp rose water or 2-3 drops of rose essence
    • 10-12 chopped pistachios
    • 10-12 chopped almonds/cashews

    Instructions

    1. Grease or line a backing sheet or plate or thali and set it aside.
    2. Tranfer the ricotta to a heay-bottomed or non-stick pan.
    3. Add the whole can of condensed milk to the ricotta. Mix well.
    4. Reduce the ricotta mixture on a medium-low heat over a stove, stirring occassionally, around 20-25 minutes. The mixture should be of fudge like consistency at the end.
    5. While the mixture is reducing you can soak saffron strands in warm milk and chop the nuts.
    6. Once the mixture has reduced to the desired consistency, turn off the stove. Add cardamom powder, saffron strands and rose water to the mix and combine all the ingredients.
    7. Transfer the mixture to the backing sheet/plate/thali and spread it evenly using a spatula.
    8. Sprinkle the corsely chopped pistachios and almonds/cashews over kalakand.
    9. Store the kalakand mixture in a refrigerator for setting, atleast 1 hr or more.
    10. Once the kalakand fudge is firm, you can slice it into equal pieces and decorate with pistachio slices for serving.
    https://www.fanciersworld.com/quick-kalakand-ricotta-fudge/

Boho Fringed Suede Shorts

You all must be thinking – shorts in fall!? Well if you wear OTK boots and fringed suede shorts on a warm sunny day of Denver, it is a fall outfit! πŸ™‚

ASOS Fringed Shorts and Suede OTK Boots in Black & White

By now, you would have realized that how much I love the bohemian style. So when I saw these Glamorous fringed shorts from ASOS, I had to get it. Plus they were on sale at $10. You cannot beat that price! I love ASOS! It is one of my favorite brands too and I shop quite often from them. They also have very good shipping and return policies.

I paired it with a striped T-shirt I bought from American Eagle Outfitters. I just recently started shopping from AE and I am actually quite impressed with their collection and service.

AEO Football T-Shirt with Shorts and OTK Boots in Black & White

This outfit would not have been complete without these gorgeous suede over-the-knee boots from ASOS. I have been looking for those perfect OTK boots and I tried couple of them before selecting these, and I am quite pleased with them. They are real suede (unlike lot of the others I tried), are affordable and have the cute lace-up fastening at the back. They also look like Stuart Weitzman Lowland boots which almost all brands were trying to replicate this season.

ASOS Suede Over the Knee Boots in Black with lace-up fastening

Boho Maxi Skirt {Indian Ghagra} + Crop Top

I am still recovering from the holiday mood with all the Indian festivals we have had for the last couple of weeks. So I thought of doing a post on fusion wear using Indian ethnic wear, inspired by another of my favorite brands Free People. I love their colorful, eclectic and bohemian clothing, and their FPMe community for styling ideas. I actually was quite inspired by their look using Delhi Dreams Skirt. It was a perfect idea as my mom bought me a colorful and vibrant ghagra for the Navratri/Dandiya festivities this year. I just styled it as a boho maxi skirt with a cropped top. πŸ™‚

Ethnic Indian Ghagra styled as Boho Maxi Skirt with a Crop Top and Hat

Ghagra is actually an Indian ethnic wear worn traditionally by women from states such as Rajasthan and Gujarat. It is a form of skirt which is long, embroidered and pleated. It is suitable for Indian occasions like Navratri or Dandiya function. This is how I wore it for the Dandiya festival.

Ethnic Indian Ghagra for the Dandiya celebration

As you can see the ghagra is usually worn with a choli which is like a cropped top along with a Dupatta(long scarf). For my boho inspired look I paired it with a mock neck long sleeved cropped top.

Boho Maxi Skirt with a High Neck Longe Sleeves Crop Top

And of course the boots and the hat to give it that edge πŸ™‚

Ethnic Indian Ghagra styled as Boho Maxi Skirt with a High Neck Longe Sleeves Crop Top

Ethnic Indian Ghagra styled as Boho Maxi Skirt with a Crop Top and Boots

Tradition Ghagra from India (similar here and here) | ASOS High Neck Long Sleeve Crop Top (similar here, here and here) | Sam Edelman Penny Boot from Nordstrom (similar here, here, here and cheaper here) | Nordstrom Rack Wool Hat(similar here and here) | Forever 21 Bangle Set (similar here and here)

Black + Boho Printed Dress

With all the beautiful fall colors and textures around, I felt like I should wear a printed dress. My black boho printed dress contrasted well with the colorful surroundings. Just perfect for the weekend fun!

Black Boho Printed Dress from ZARA

Did I tell you that I am a big fan of ZARA? They make fashion forward clothing affordable! I am totally loving their FW ’15 collection. I also frequent their “Special Prices” section, which is where I found this pretty Boho Printed Dress. They also come in equally pretty red and green colors, but somehow I was drawn towards the Black πŸ™‚

The fun and flirty All Black Outfit with Boho Printed Dress from ZARA!

ZARA also carries a great collection of handbags. They are fun, stylish yet budget-friendlt. I bought this Tassel Bucket Bag for only $30 and I am very pleased with its quality. No wonder they sold out, but no worries, I have some awesome list of suggestions for similar bags at the end of the post.

Black Boho Printed Dress with Bucket Bag and Tall Riding Boots!

And just to give the outfit a little more edge, I wore this black waist coat that I have had for a very long time. Good thing that the fashion trends keep on repeating themselves. πŸ˜‰

All Black Outfit with Boho Printed Dress from ZARA and Waist Coat

ZARA Printed Dress (similar here, here, here and here) | ZARA Tassel Bucket Bag (similar here, here, here and here) | Short Waistcoat (similar here and here) | Sam Edelman Penny Boot from Nordstrom (similar here, here, here and cheaper here)

70s Overall Dress -> Halloween Scarecrow

The ’70s are back in a big way. You can see the influence in the color, texture and styling of the clothes. So when I saw this 70s Orange Corduroy Overall Dress from ASOS, I had to get that trend.

70s Corduroy Overall Dress from ASOS paired with chocolate brown sweater

For the outfit, I paired it with a chocolate colored round-neck sweater from Zara. I love the vent and button details on the sleeves. Zara always carries such a nice collection of knitwear. Then I just had to grab my cute little fringe crossbody bag from American Eagle Outfitters, perfect to carry my phone and cards for the weekend stroll πŸ™‚

Overall Dress

This outfit would not have been complete without my favorite tall suede lace-up knee-high boots from Free People which I bought recently. These boots are made for walkin’! πŸ™‚

ASOS Cord Overall dress with Brown Sweater and Free Peope Johnny Tall Boots

Oh! And did I tell you that this dress has exposed zipper in the back besides the cool pockets in the front.

ASOS Cord Overall dress with exposed zipper

Yup! You can tell that I am having fun wearing this outfit. But the best part of it was that I could wear this same outfit to my Halloween party! The idea came to me when I saw the scarecrow in my neighbour’s porch. I realized that I have pumpkin colored overall dress, I just need some fringes! So I just cut some gift tissue to make some inexpensive fringes for a totally wearable and stylish costume! πŸ˜‰

Corduroy Overall Dress as Halloween Scarecrow Costume!